Have you ever wanted to know how to repair a camper van? Camper van exteriors are mostly made of reinforced plastic parts, allowing repairs that most DIY enthusiasts can easily undertake.
Using Fibreglass and Polyester Resin materials are the most common and efficient way of repairing a camper van. It can be used to repair cracks and holes in the fairing or leaks in the roof.
Why choose fibreglass for camper van repairs
Fibreglass, once mixed with a thermosetting resin such as Polyester or Epoxy resin, will provide a strong and long lasting reinforcement to efficiently repair dings and roof damage to a camper van.
Glass reinforced plastic (GRP) is very lightweight and has almost no limit regarding the way it can be shaped.
Fibreglass is also a very cost efficient way of repairing a van, compared to traditional repair materials. It also allows different types of finishes (textures and colours) that will fit perfectly with the rest of the van.
NB: The area to be repaired should always be sanded to ensure good adhesion for the GRP Repair materials. It should then be wiped down with acetone and free of any contamination (corrosion, etc.)
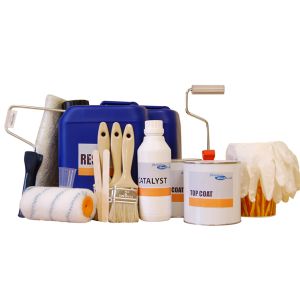
If you are unsure of how much fibreglass material you may need, use our General fibreglass calculator to give you the quantities!

How to repair the external surface of the camper van roof
Hail storm or any other damage to the roof of a camper van can cause leaks that need to be treated as soon as possible to avoid further damage to the van.
To repair a fibreglass roof surface of a camper van made with gelcoat / topcoat, the first step is to rub back the whole area to be repaired with medium/fine sandpaper until you reach the laminate (usually the laminate is a different colour to the topcoat but not in all cases so be careful you are looking for glass fibre strands this is the laminate). The quality of the grinding job is critical to ensure a good repair. Ensure that all damaged material is removed.
The surface should then be carefully cleaned with Acetone. It is important to make sure there is no contamination on the surface as this may affect the bonding of the resin to the repair area.
Now paint the area you have rubbed back with 2% catalysed topcoat made to the specific RAL colour of the van or you could purchase clear topcoat and a small quantity of pigment matc
hing the colour of your camper (8% pigment approximately). Once the topcoat as gone off 2-3 hours you can rub back again with fine sandpaper and then use polishing compounds and a buffer to blend into the existing roof colour.
What if . . . a deep hole/crack that needs to be repaired?
Here you have two options either:
Mix bodyfiller and apply it on the hole/crack until it is flush with the surface. Once cured, sand the bodyfiller until it has a smooth finish. This is a method that will leave the colour fo the body filler suitable if aesthetics isn’t an issue.
Or
If you can get to the underside fo the roof laminate (fibreglass) sand it back with course sand paper, then remove dust with acetone to ensure good adhesion, cut a patch of 450g/m2 fibreglass that has sufficient overhang (half the size of the hole overhang all around) wet out the patch and ten place on the underside of the underside of the hole. Roll the fibreglass out with a paddle roller and await the cure. (Cure is when the patch goes hard enough to sand should you want to.) Now on the top you should have a hole with a backing of fibreglass. You can either cut out a patch of fibreglass to sit inside the hole and wet out with catalysed resin being sure not to flood the hole just a bit at a time patting on with a brush. Before the fibreglass cures wipe around the edge with acetone on a cloth taking away any excess resin. Allow the glassfibre to cure and then follow on with the topcoat repair mentioned previously in this article.
If the material to reinforce is metal, apply a layer of G4 sealer that will act as a primer and ensure perfect adherence of the fibreglass. The fibreglass must be applied once the G4 sealer is tackie to touch and not more than 4 hours after application.
Before fibreglass is mixed ensure that all materials are ready and the glass is cut before mixing the resin (once catalysed you have limited time before it goes hard).
Depending on the depth of the area to be repaired, usually three layers of fibreglass should be cut. The first layer should be slightly smaller than the repair, the second should be the same size as the area to be repaired and the final layer should be about 20mm wider than the area to be repaired.
If the surface to cover is large, it is best to work with smaller areas first. Ensure each piece of glass overlaps by approximately 2 inches on each section for a perfect blend.

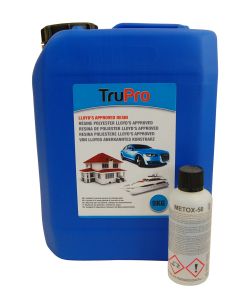
Mix the Polyester Roofing Resin with 2% catalyst to allow a 15 minutes working time at 20 degrees.
Apply the first layer of resin to the repair area using a brush and then apply one layer of 450 g/m² glass mat. With a brush, apply more resin on the glass and make sure the mat is completely wet through (should be almost transparent), with no air pockets. Repeat the process adding layers of fibreglass until the level of the fibreglass is slightly higher than the surrounding area.
Once the surface has cured, sand it down to remove any sharp pieces of glass and to remove any highs in your repair. Good sanding will also provide a better smoother finish. Start with low grade sandpaper and progressively increase the grain until the finish suits your needs.
The surface should then be wiped down with Acetone to remove any dust and contamination before applying the Topcoat. Apply a layer of your chosen coloured Topcoat and rub back with fine sandpaper then polish to ensure a perfectly weatherproofed repair.
The camper van roof is now ready to protect you for a long time.
How to repair a camper van with Fibreglass
Repairing a camper van with fibreglass is not very different to any other fibreglass repair. You can read our article about fibreglass repair to learn more about how to proceed to basic repairs.
However, if your van has a stress crack, consider drilling a small hole where the crack ends to prevent it from expanding further. This will reduce the stress at this point and allow the repair to be more effective. You can then sand down the area around the crack and start the repairing process.
Where to buy fibreglass for camper vans repair?
FibreGlassDirect sells a wide range of fibreglass and resins to suit all of your repair needs.
To repair a camper van roof: