Our website uses cookies to enhance your experience.
By continuing to use our website, you are agreeing to our use of cookies. Necessary cookies are always enabled.
You can read more about our
Cookie Policy
in our Privacy policy
We value your privacy
Strictly Neccessary
Essential cookies enable core website functionality,
such as secure logins and preference settings, without tracking personal activities or collecting data for ads.
They ensure the site's proper operation and legal compliance, remaining always active
Preferences
Preference cookies enhance your browsing by remembering settings like language and regional preferences,
tailoring the site to your needs without tracking activity across other websites
Statistical
Statistics cookies gather anonymous data on site interactions and page visits to help improve functionality,
ensuring a smoother user experience without personally identifying users
Marketing
Marketing cookies track browsing habits across websites to deliver relevant,
tailored ads, enhancing value for publishers and advertisers by focusing on individual preferences.
All of your questions in relation to Fibreglass Roofing answered here at FibreGlassDirect. Expert answers on all aspects of application including trims, topcoat and the laminating process.
The best option to repair the roof, is to sand/scuff the area around the crack with an 80 frit sandpaper, allowing 50mm min beyond the edges of the crack. This will key surface. Clean down with acetone. If the crack is very open and frayed, then cut back the edges completely to expose the board underneath. Again sand the surface of the board with sandpaper, clean off the dust and wipe with acetone. Apply a layer of glass strip over the crack again 50mm wider than the actual crack area, and laminate with resin. Ensure to consolidate well, making sure no air pockets or creases appear. This should adhere the glass to the surface underneath and around the edges. Once cured, you may require an additional layer as above, again go 50mm beyond the previous and laminate as above. Allow to cure again and then scuff surface lightly to key. Clean again with acetone and mix and apply and Topcoat to... Read more
Question:
It's my first time repairing a fibreglass roof and I have some questions:
What do you do with the Topcoat?
If doing a roof for the first time would it be advisable to apply two layers of matting?
When fitting the OSB, is it fitted tight or should I leave a gap or tongue & grooved?
Answer:
If you are doing a new roof, we would always recommend you use 18mm T&G OSB3 boards, they need to be fitted as per manufacturer instruction so should have expansion against any walls of 10-20mm.For general weatherproofing, 1 layer of 450g matting is sufficient but if there will be any moderate foot traffic in the future, then use 1 x 600g layer of matting. In the event of a roof balcony, roof garden or additional loading then 2 x 450g layers of matting would be required.
Resin consumption for fibreglass onto OSB is:
1.5kg for 450g
2kg for 600g
followed by 1kg or 1.5kg for second layers where appropriate
With regard to Topcoat, coverage is 500-600g per sqm. When redoing an existing roof, you should scuff/sand the existing surface to key, brush down and clean with acetone prior to mixing and then apply the Topcoat. For best results on Topcoat, you should apply it with a Mohair... Read more
There could be several different reasons as to why the Topcoat on your Roof has started to crack.
Here are the most common reasons that we come across:
1. OSB Boards
The osb3 should be laid upside down on the rough side writing showing upwards. This should leave a 2-millimeter gap between the structure of the board.
No materials should be applied to the shiny side of the osb3.
2. Topcoat Applied too Thick
The dark grey topcoat may have been applied too thick. The installer may have also not sanded and/or wiped down with acetone before application this will cause clanging and banging. Any thicker than half a millimetre of topcoat applied will crack.
3. Roof... Read more
In short, yes. Fibreglass can be applied to a pitched roof. Although fibreglass is most commonly known in the market for flat roofing, fibreglass can be applied vertically also.
Unfortunately, you cannot apply the Flex (or any Polyester Resin) directly to the Bitumen Roof. This type of Polyester Resin will not adhere to Bitumen. The Roof would need to be stripped back and applied to OSB3 Board.
Quite simply put, it’s down to the quality of the materials. Our Fibreglass Roof Kits have been sold for 30 years throughout the UK and Ireland. We have only ever bought from trusted composite manufacturers who supply material that we have rigorously tested.
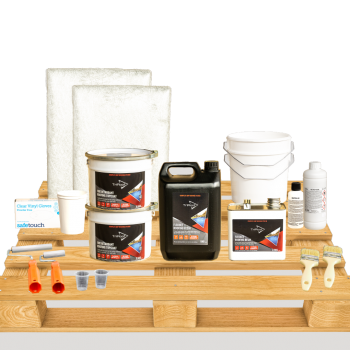
What is contained in the Fibreglass Roof Kits?
In our Roof Kits, you will never find a re-blended resin. This is often supplied by other companies in a bid to lower prices. As we cannot guarantee the quality for such a critical project, we offer a Lloyd’s Approved, a certified resin in our Standard Fibreglass Roof Kits and a Premium Flex Roofing Resin in our Premium Fibreglass Roof Kits.
Our Premium Kits are also supplied with a Fire-Retardant Roofing Topcoat for additional peace of mind. This is particularly important for residential roofing applications or structures that will house hazardous materials. The certificate for this fire retardancy testing is available to view on our website.
In addition to the quality of the materials supplied, an additional point to note is the quantity we supply. At FibreGlassDirect we offer 1.5kg of resin per square metre in our 450g Fibreglass Roofing Kits to allow for soakage into OSB Boards. We offer 2kg per square metre in our 600g Fibreglass Roof Kits to allow to soakage too.
Topcoat for both options (450g & 600g) topcoat is supplied at 0.6kg per square metre, allowing for plenty of coverage.
The only thing not allocated in our kits are Fibreglass Roof Trims, Glass Bandage Roll and Acetone. We have left these out as to not increase the price of the kits unnecessarily. Trims are entirely dependant on the shape and size of the roof and will, therefore, vary quite a lot. Acetone is something we do supply on FibreGlassDirect but is not directly needed by every customer so we have left this as an optional extra.
More information on Fibreglass Roof Kits
If you would like more information from our team, please do not hesitate to get in... Read more
Yes, a Fibreglass Roof can be walked on. Depending on the volume of foot traffic expected for the roof to take, this will determine the weight of matting that should be used in the construction of the roof. A roof with little to no foot traffic expected would suit 1 layer of 450g matting, a moderate level of foot traffic should use 1 layer of 600g matting and a balcony or a roof with regular foot traffic should use 2 layers of 450g matting. A non-slip Topcoat is also highly recommended for areas with foot traffic... Read more
If your flat roof is starting to pond, fear not! In some instances, it may be possible to sand back the existing layer and apply a layer of bodyfiller. The bodyfiller will help to raise the area where the water is pooling and aid water run-off. Once, the bodyfiller has been applied, cured and sanded to suit you will need to wipe the area down with Acetone to remove any contaminants. You may then re-apply the resin, matting and topcoat to ensure your GRP Roof remains watertight.
Provided there is no structural damage to the roof, a new layer of topcoat may be applied. For a cosmetic refresh, simply sand back the existing layer of topcoat and wipe down with acetone. This will prep the area and give the new layer of topcoat something to adhere to. Once prepped, the new layer of Roofing Topcoat can be applied.
In this instance, a fibreglass roof kit may be used to complete the repair. The first step would be to sand back the exisiting surface to expose the fibreglass and then clean with acetone. Measure the amount of fibreglass mat you will need.
Cut your new fibreglass mat into strips of an appropriate width for covering over the cracks. Ensure there is an overlap of 50mm either side of the crack.
Apply a wet coat of resin to the surface and bed down the new matting. Ensure the glass is completely wet through with resin (it will go transparent).
Taking a paddle roller, consolidate the glass and resin ensuring that matting is wet through and well consolidated to surface. There should be no trapped air.
Allow to cure. Once cured (min 3 hours), sand back with 80 grit sandpaper to key surface and clean with acetone. Mix topcoat with catalyst and apply. Allow to... Read more
Before starting laminating, ensure that the weather conditions will be acceptable. Do not lay the roof if rain is forecasted. Temperatures should be at least 15°C to allow the resin to cure. If the temperature is too hot (over 25°C) the resin will cure too quickly.
Sweep down the roof to remove any debris. We start by bandaging the joints, trims and corners.
If you are not using T&G, the joints in the decking should be taped up using masking or any type of tape. This is just to prevent the resin from dripping between the boards. We used T&G so there was no need for this here but we have shown it for demonstration purposes.
Glass bandage should be used to strengthen all the joints on the decking and the trims. Measure out the glass bandage roll and cut or tear to length. It is a good idea to lay the bandage out on the roof before rolling it up and placing beside the joints ready to use.
Weigh out your resin. Mix 2% catalyst in with the resin. For this, we mixed 0.5kg of resin at a time.
Wet out the joint with resin using a paint brush or roller.
Roll out the glass tape over the resin.
Wet out the glass with more resin, until it is fully saturated.
Consolidate with a paddle roller. Ensure there are no pinholes and the mat turns transparent.
This should be repeated with the joints in the trims. Wet out the joints with the resin using a paint brush again.
The edges of the fibreglass can be frayed or feathered, by pulling at the edges to make the seam less visible on the front trim. This will help with the final appearance.
Wet out the glass with a paint brush as before.
Consolidate with a paddle roller
To fibreglass, the ends of the raised edge roofing trims, cut out a square of fibreglass that covers the area +50mm onto the trim. Cut relief cuts around the top of the fibreglass so that it can be folded smoothly over the top of the trim.
Again, wet the glass mat out with a paint brush and consolidate with a paddle roller.
The same method should be used on the internal corners.
Measure the fibreglass mat to size and cut using a Stanley knife. When joining two pieces of the mat, the edges should overlap by 50mm.
To create a less visible seam between the two mats, the edges are frayed by lightly pulling.
Mix the resin and catalyst. Place the bucket on the weighing scales and reset the scales.
We recommend mixing 2kg at a time. This will be enough to cover 1m2 at room temperature.
Add the catalyst to the resin. The recommended rate for adding catalyst is 2% at room temperature. Mix the resin and catalyst thoroughly for at least one minute, It will change colour slightly as the catalyst is mixed through.
Use a roller to wet out the OSB board
Lay the fibreglass out onto the wet resin.
Apply more resin to the glass mat until the glass mat is fully wet out. Consolidate the resin and glass with a paddle roller. Ensure that there are no pin holes. The glass will start to appear transparent at this stage.
It is a good idea when working on a larger roof to have one person putting on the resin and the mat and a second person following.
Once cured, lightly sand the area with a coarse sandpaper. The roof is now ready for... Read more